Wednesday, January 9, 2013
Val's Gown - Bethany and Robert Investiture
Thursday, December 6, 2012
Dickens - Down to the Wire
![]() |
I did end up piping the waistband....and I really like the way it looks!
If I'm ever in the market to do this type of dress again,
I'll certainly be doing piping everything!
|
![]() |
I ended up piping the curved back seams, the waistband, collar,
and the sleeves. I think it gives it a nice finished look.
(And also somewhat hides some of the less-than-perfect
pattern matching...)
|
![]() |
| ....And here is the whole bodice - before buttons and skirt attachments. |
Melia and I also raided my hat stash last night, and came up with a cute lace cap & bonnet combo. As much as I wish I had a bonnet as well, I have a pretty spiffy antique lace cap that I am going to wear instead. Not the right time period, but considering the suggestions for headwear in the vendor packet, I don't think there is any room for complaints!
We also found my old black crochet sontag for Melia to use - I have the feeling that it is going to be pretty bitterly cold in there!
Thursday, November 15, 2012
Alice in Wonderland Tea 2012
Saturday, November 10, 2012
The (Short) Tale of the Last Minute Pansy
Basically, what I did was this: (And by "I", I mean, directed Melia and Holly on what to cut out, while I sewed button holes and sniffled through a head cold)
Cut 2 large petal shapes of one shade of purple
Cut 1 large petal shape of another shade of purple
Cut 2 small petal shapes of yet another shade of purple
The pieces look like this:
The pieces, when assembled, should look somewhat like this:
Monday, November 5, 2012
A Cunning Hat Indeed!
It kind of makes me giggle with excitement - I think this is the best version yet! (Although the ear flapadoodles are way, way curly....I think (hopefully!) they'll relax over time with some tugging and whatnot!
I've made massive progress on the Alice in Wonderland Tea gown for Melia, but I need to get around to photographing what I've done! Less than a week away, and as a super-bonus, Jannean is coming out to visit that weekend and attend the tea as well!
Sunday, October 28, 2012
Tale of the Cunning Hat - Continued
If you look at this specific image, you can see that the outer part of the ear-flapadoodles are knit, and the inside are purl (the underside of the flap by his right ear) - I think that's called stockinette? Anyway, it took me a minute to figure out what stitch would do the distinctive curl at the ends! I did a few rows straight down, and then decreased at either end of the knit side, and then used the end to tie off two strands that I ran through the edges of the flappy parts.
This hat is due by 6:30 am tomorrow, so I'll probably let this one go as is, but continue the perfection of the Jayne Cobb Hat for a certain brother..... :)
| “How’s it sit? Pretty cunning, don’tchya think?” |
Tuesday, October 9, 2012
Much-belated post RE: Loose Gown
However, thanks to the power of social media and Crystal prompting me to post....here are some pics of the Gown of Doom. I have never, ever spent that much time on any one piece, and I honestly hope to never do so again! (Although, I do have to say, I am kind of chuffed that I actually did it!)
(It's the red velvet gown worn by HRM on the left)
![]() |
| Each of those black strips is applique, and 3 rows of gold couching - the middle section being looped - the texture is pretty cool, if I do say so myself! Her sleeves are also pinked. |
![]() |
| It's a bit easier to see the loopy texture in this pic.... |
![]() |
| There are 3 (or 4?? I forget now...) large-scale applique and-couching patterns around the hem of the skirt |
All pictures courtesy of Jason Connor.
Saturday, August 13, 2011
MMM Pics
I finally figured out the best way to get Lil Miss to sit still long enough to get her picture taken was to have her sit on my lap. It was so hellishly hot, I finally gave in and took of my sleeves for a short while. I promise, I wore them for most of the day! (As a side-note, my sister came up with a cunning plan to keep my sleeves on properly – the trick is to twist the loops before buttoning. Amazing!)
The trick to get him to pose properly is to get him to sit with his sister!
Here are a couple “in action” shots of Lil Miss in her kirtle. She was twirling and spinning and dancing around so much, it was hard to get a good shot!
I didn’t get any pictures of the red surcote, as she wore it last night (and apparently she wouldn’t take it off last night to go to bed!), and I didn’t remember to grab any pictures of the “owen incess” (roman princess) dress.
Friday, August 12, 2011
Kiddie Garb Accomplished!
I finally finished with the dress for my little niece. It's certainly a cold-weather/night time outfit, as it is all wool and very snuggly. I don't have any pictures of her wearing it quite yet, but here is the finished project:
2 outfits down, one to go!
Sis finished both the surcoat and roman outfits. I'm done with the kirtle, and just need to finish up the sleeves and cape. Lil Miss will be well dressed for the event!
Tuesday, June 7, 2011
Shade Fly–Complete!
Bright orange stakes notwithstanding, the shade fly is now complete! I can’t say I’m 100% happy with it, but will suit my needs.
I had thought that making my own shade fly would make it less expensive, but what with all the bits and pieces I ended up purchasing, I spent nearly as much as a commercial shade fly, without all the extras. Oh well, it was a learning experience!
The back is facing due north, so is not very shady, as the moniker “shade fly” might suggest. The curtains I hope will come in handy as the sun moves across the sky, making shade where needed. I’ll also try to set up with the back facing west whenever possible so from noon on it should stay fairly shady on it’s own.
I’m hoping to pick up some plastic spray paint in black to tame some of the ‘orangeyness’ of the stakes, and I’m wiffling on whether I should get a length of dowel to make rope tensioners; but if it doesn’t end up happening, I’ll still survive.
I’ll be taking it to Uprising for a trial run to see how it does….wish me luck!
p.s. It's set up a bit wonky and I didn't straighten the poles....both things that will be fixed for a 'real' setup!
Thursday, June 2, 2011
Green and Gold–Finished
I’m kind of *meh* about the sleeves. I thought I would like the buttoned sleeves, but I’m starting to think they will be a PITA. Time will tell, I suppose.
On the other hand, I’m pretty stoked about the dress itself. It fits pretty good, though the straps will need dressing pins to keep the shoulders from sliding off.
I’m planning on wearing this with my square-necked camacia and my organza partlet.
Yet another thing to add to the pile of “Completely Finished” (even if I’m less than ecstatic about it.)
Oh yeah, I forgot to list my gold and green petticoat on the “Completely Finished” post a while back…..that one’s done too!
Next up is the red gown tuck!
Tuesday, May 31, 2011
Green gown–(mostly) finished!
I don’t have a lot to say on the construction of this gown, it’s my standard side-back lacing pattern, with the exception of a slightly narrower shoulder strap, and the felt padded hem….my new love!
The pictures of the gown look much more gold than it is IRL. (I’m also slightly worried that I messed up on my math and the back is too short, but I’ll put it all on tomorrow and find out for sure….it could just be that poor Bertha is not a very good approximation of my body!)
Here’s a close-up of the fabric, which more closely approximates the ‘real’ color of the dress.
And just for giggles, here’s the silk for the Turkish robe draped over the shoulders:
There was drama with the rest of the fabric going missing (which I eventually found, obviously)….and now the next drama is my trusty curved sleeve pattern is now AWOL too! I’m very sad about this because I spend countless hours tweaking it just so. I’m really, really hoping I can find it, I will be lost without it!
On the docket tomorrow is to search thoroughly for the sleeve pattern (and make the sleeves if it shows up), and finally figure out what I’m going to do for a partlet. No really, I’ve been putting it off for long enough, it’s time.
Progress! Update of all the finished stuff…..
My little pile of “projects that are completely finished” is growing larger!
From left to right:
- chopines
- painted curtains
- kneeler
- pillow (which I wasn’t planning on, but I had a chunk of embroidered velvet that needed to be something
I didn’t do a project diary of the kneeler, but it’s pretty basic. I took the embroidered velvet (which is a scrap from the gown that I helped create for my laurel’s laurelling!), and a plain wooden stool from a craft store.
Since I’m completely on this ‘from my stash’ kick, instead of staining it like I had originally planned, I used the ‘champagne gold’ paint from the curtain project and coated many layers. because it’s more silvery than gold, I changed up the embroidery on the cover, and used blue instead of red. (blue always seems to go with silver better than red does)
I layered foam over the pained stool, and firmly tacked it in place with canvas, close to the outside edge, so the strain of compressing the foam is taken up by the canvas.
Then I covered that with the pretty stuff, and stapled it in further in the stool. (my staple gun and I have become very good friends over the last week or so!)
I was unhappy with the raw edges, so went digging through my stash, and found some leftovers of the black and gold trim that my good friend Jannean gave me…..perfect for covering those cut edges!
The kneeler is on the small side, so isn’t a perfect size for that bit, but will become a fantastic foot stool after the fact.
Thursday, May 26, 2011
Final Chopine Update (!!!)
Finally, at long last, I was able to completely finish a project….I am so excited! (And my wrists are thanking me, too!) After weeks and weeks of unfinished projects, it feels so good to be able to completely check something off the list-O-doom.
I spent most of the day finishing up the sole and doing the decoration – which sounds like it wouldn’t take that long, but with having to run to the store, stopping to chat with friends, and being indecisive about the lace, it took a while!
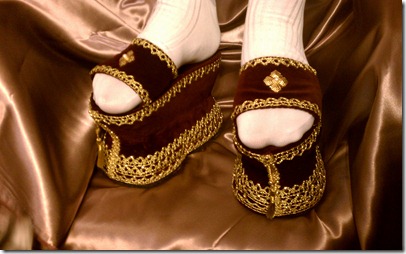
My original plan was to do the very simple braid covering the seams like on my original inspiration chopines….however, the more I thought about it, the more I wanted to put more bling on them. I think they turned out quite nice for my first ever shoes, if I do say so myself!
There certainly are things that I would do differently if I were to do them again, but nothing that actually bugs me enough to worry about.
I thought about doing something boufty and cute on the straps, but I didn’t want things getting caught up in my petticoat, so I decided on a flat lace & a small medallion instead. I haven’t seen anything to directly support this mode of décor, and I’ve only seen one pair so far (much later period) that has the braid around the top…..so both those things are questionable, but I like the way it looks, so did it anyway. The upper braid also does double-duty of covering some of the bumpiness from the transition from the leather sole to the cork…in another pair, I will be more careful to shape that portion properly. I wouldn’t hate the way it looks without the braid, but it certainly does detract from that area…I didn’t realize it would show quite so much!
I can’t find my ‘real’ camera, so cell phone pictures it will have to be for the time being, but I can’t wait to post about them, so here they are!
And now for some foot shots!
And for good measure, here’s a couple of pics of my good friend Holly trying on my gown, complete with chopines:
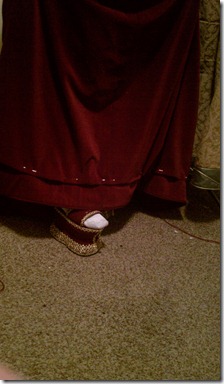
It takes a little getting used to, but they’re relatively easy to walk in, and are very comfortable.
The biggest change I would make is some sort of angle to the foot bed…having them so flat almost makes me feel like I’m tipping backwards.
Another thing I would change is the angle of the curvature on the sides; which has always kind of bugged me throughout the project, but never was able to get quite right. (I am so glad I went back and took out the bulbousness of the sides….I doubt I would be nearly as happy now if I had not done so.) I was a little nervous about making the curve too drastic and weakening the integrity of the cork, so that may have to be something that happens with a wooden or high-density cork version.
All in all, I’m really quite pleased with them, and with myself for being able to do so many new things all in one project!