Tuesday, April 14, 2009

First Day at the Opera...

And it was a good one! It was a long day, but I had a really good time. I can't wait to go back!

I ended up preparing a returning show for drycleaning for about half the day. The remainder of the day I measured skirts, organized the fabric stash (puts mine to shame!), and did some laundry. (I removed the blood from Lucia's nightgown. teehee!)

And now for some peekshurs!

Some seriously nice 18th century men's jackets. I really wanted to poke at 'em, but they're too high up to easily fondle!


And some pretty rad hats (I think they're getting ready to be packaged up for Little Women)


And the bestest.....there are eight rows...the cart in the aisle is about half way down the aisle, it disappears into the distance!

Monday, April 6, 2009

Pie Crust Hat.....Has Happened!!!

I've been on a weird early-period hat thing lately. And most recently, I've been craving a pie-crust hat.

Here's the final product --


I forgot to take pictures at the very beginning of the pie crust adventure, so here's the lowdown.....I cut a piece of canvas big enough to go around my noggin, plus 1". Then kinda eyeballed how high I wanted it and added 1/2".

Then I cut a piece of linen as long and 2x as wide, plus 1".

I tacked the linen to the canvas along one long edge, and sewed the short sides together. Then, I eyeballed a doughnut of cotton taffeta (that stuff is teh bomb, I'll be sad when it's gone, I use it for *everything*) and pinned and sewed the inside of the doughnut to the sewn linen/canvas tube. Like-a-so --

(On the left is the doughnut, in the middle is the canvas, and on the right is the linen lining. The lining will be flipped over and cover the seam later on....)

Then I quickly tacked down the seam allowance that includes the canvas, linen, and doughnut.


Then I turned over the excess linen to enclose all the seams. (I have a sort of allergic reaction to unfinished seams and ugly hems.)

(The doughnut is on the right, the canvas is now completely enclosed in the linen lining)

After a thorough pressing, I quickly tacked down the lining. As this was on the inside, I didn't need to worry too much about what the stitches looked like.


The entire inside structure of the hat is finished. The 'collar' looking thing is what is going to be pleated and tacked to the top edge to get the 'ruffly' look. I was originally going to do a rolled hem, but then as I was messing around with the fabric, I realized the cotton is so tightly woven that I could cut it, turn it, and leave it. (Remember that whole allergy thing? I'm really trying to get over it. Really.)


I started pinning at the quarters, and then messed around from there. I ended up doing quarters, eighths, and 1/3 of each of the eighths. Whatever that leaves me with.

(This was a test for wider ruffles. I ended up having 6 in the quarter rather than the 4 shown.)

And here is a comparison between the wider and the shorter ruffles. I ended up going with the ones below.


Tack down at each of the pins, and voila, you have a pie crust hat (Or maybe a 'goffered barbette'? Is that a real term?)

Tuesday, March 24, 2009

Even MORE RVIoD Thoughts...

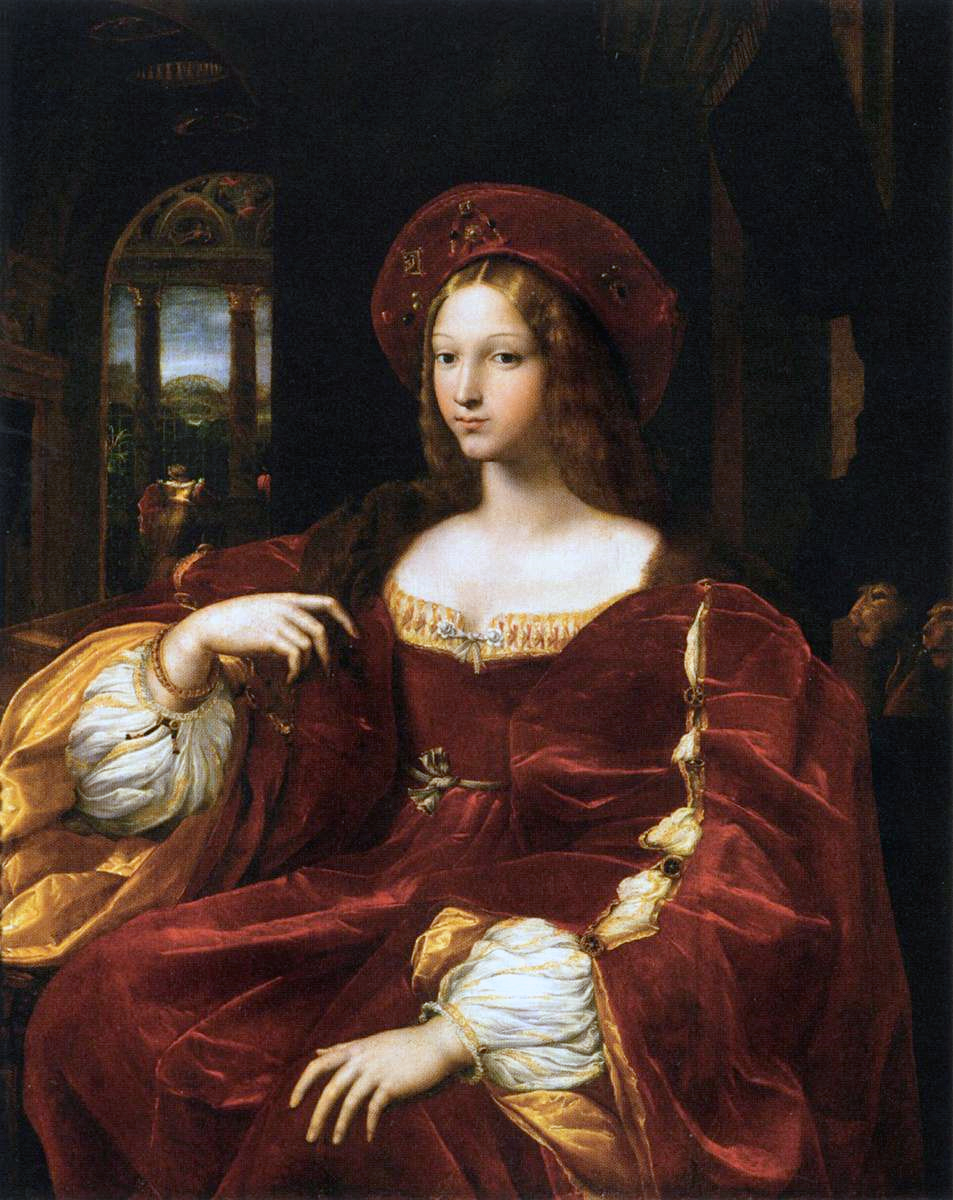
On a whim, last night, I had Husband look at the RVIoD portrait and tell me what he thought about the neckline. He came up with something COMPLETELY DIFFERENT, and totally awesome....tell me if you see what I see!!!

Here's a refresher...(and the webpage if you want to blow it up more!)


It's a 'magic eye' kind of a thing....One of the biggest insights Hubby had was that he saw gold-ish pearls in the center of each repeat. Now that he has said it, I can't look at the neckline without seeing the beads/pearls, where as before, it had never even crossed my mind.

Do you see the bead/pearl thingies too??!

Sunday, March 22, 2009

I learned a new thing today....


I taught myself how to do 7-strand braided cord this morning...I'm pretty stoked...for no apparant reason.

It takes longer to create the braided cord than lucet cord does, but the overall effect is really pretty neat. I need to find some sort of project that encompasses all the little mini-skillz I've been picking up lately.

Saturday, March 14, 2009

RVIoD Updates...

My linen has arrived!!! It's absolutely beautiful, I love it! I really cannot wait to dig into working on the camacia, embroidery and construction.

But I am paranoid that I am going to make the wrong decision and mess things up, or go off the deep end and spend tons of time and effort going down the wrong path.

I've been futzing around with the pleating and smocking for the camacia for the RVIoD dress, and I continue the thinky thoughts....

In these experiments, I've come to the conclusion that the neckline is probably not smocked, nor is the decorative edge the same weight and/or fabric as the sleeves (Added bulk from embroidery, perhaps??). I am leaning more and more to the option of embroidering a neckband, and pleating (or gathering) the neckline of the camacia to the band. The neckline looks like it has 'depth' and a heft to it.


(Me messing around with embroidering with gold and silk threads.)

I've been digging around in my books for any support for a heavily embroidered, seperate neckband, and I'm coming up empty. But then again, most of the information that I've found so far are 80-100 years or so too late for the period I'm looking at. I'm still on the lookout for any period (early 1500's) embroidery patterns that would sufficiently mimic the neckline and/or sleeves. (If I do indeed end up embroidering the neck band I will most likely be using various shades of yellow silk and gold thread)

On the other hand, I think the smocking is going to be PERFECT for mimicing the look of the sleeve cuffs. I think there are 7-8 vertical gold/yellow rows running up the sleeve. Whether they were originally part of the fabric or embroidered, I don't really know, but I will most likely have to embroider them, as I am pretty sure I'll not be able to find the right fabric to use. I will most likely be using only silk on the sleeves, since the gold tends to get scratchy.


Unfortunately, both the sleeves and the neckline are not good enough resolution to try and parse what the actual pattern is, It's guesswork from here on out!

I'm pretty sure that the cuffs are embroidered with plain squares. In PoF4, I'm kind of digging the embroidery and lace patterns on pg. 111 from a smock....(If I use these, they're at least documentable, not some crazy thing I made up from looking at the portraits.

I'm thinking the lace pattern may translate well to the neckline embroidery...


And a possible pattern for the verticals on the sleeves. (With or without the flowers on the sides?)

Sunday, March 8, 2009

Sunday = Funday!

I got even *more* done on the stripey vic! Sunday I started work on the gold silk underskirt, and got quite a bit done, considering I took a break and went on a movie date with hubby. (Alice in Wonderland was awesome, btw.)

I'm a total n00b when it comes to serious skirt draping, and anything Victorian, so this is all a new experience for me. Hopefully I don't mess it up too much. I had some awesome eyelet I wanted to use for the petticoat, but the pattern didn't have a straight hem, so I made some stuff up. Fortunately, I think it worked out OK, because it would be much easier to do the pleats on the underskirt against a nice, straight hem.

So, this is the basic shape of the skirt, the way the pattern said to construct it. The orange line is the gathers would be to fit over the bustle, and the train bit hangs over the bustle, making a nice straight hem at the bottom. Problem is, I want my hem to be all on the straight of grain. (I don't know if there is a specific reason it's a bad idea to do it that way, but I'll let y'all know if I have problems with it down the road. Right now, it seems to be fine)


So, I flipped the pattern piece upside down and backwards, and now the straight of grain is all along the bottom edge of the skirt, and the curve is gathered into the waistband. (I think this method gives slightly more area to be gathered into the waistband, but it wasn't terribly noticable)


And this is what I end up with! Nice parallel-to-the-ground skirts, with no curves at the hem! "Uh, but Noelle, your overskirt is far too short, and looks kinda silly"


Never fear, my dears! I acutally *meant to do that, I have *a cunning plan*.....

Pleats! (Lots and lots and lots of 'em) I spent the entire pre-Oscar and Oscar ceremonies ironing and pleating and pleating and ironing. I made a handydandy cardboard jig to make sure all the pleats were nice and even - made things so much faster and neater!

RS
WS
WS
WS
RS
RS

After I got all the pleates pressed and pinned, I sewed a stay stitching line so I could pin them to the skirts and check out the final product:


I'm trying to decide what to do with the pleats after they're sewn on. I need something to cover the ugly stitch, and right now I'm wiffling between some red velvet ribbon, and making some bias out of the gold and tacking that on. Hmmmmm *ponder*


I still have the striped draped apron-y thing to go, but it's coming together, I think! (Forgive Bertha, she doesn't quite fit, so things are wrinkly and kinda crazy)


Ok, still do to on this outfit:

1. Buttons/buttonholes. Yes. I am a chicken.
2. Hat/trimming I'm starting to think I might do a different style. I'll have to see how I feel when I come to this bit.
3. Hooks/buttons on bustle/petticoat/underskirt
4. Finish underskirt - sew down waistband, pleats
5. Make draped apron
6. Make corset cover
6a. Make new corset? (Technically my old one is OK, but I wanna new one!)

Saturday, February 21, 2009

More Different Other...

My lame miniscule attempt at needlelace...


And my garb is *so* not "from a pet-free home"...


Also, Sis and I worked on some costumes for her new business venture, and it was SO WEIRD topstitching with a machine, using elastic, and using "whoa that ain't period!" fabrics! (Weird, but oddly liberating, in a way.)

I'll post pics of what we made tomorrow, I'm too tired to go back upstairs to snap a pic.

g'Night all....

Friday, February 20, 2009

Analysis of Holly's Dress


Ok, this is for you, Holly!


I used the same method as my picture. There was a lot more on this portrait to measure, though! I had Holly measure her lip/chin ratio. The picture I found of holly was a lot darker, and so I removed her picture after lining everything up....


And the results -- (Roughly)

Width of bodice panel, 8 3/4"
Width of gap in bodice, 3 1/2"
Width of guards on bodice, 1 1/2"
Width of ruffle on camacia, 1 1/4"
Width of band on camacia, 3/4"
Width of ruffle on under sleeve, 1 3/4"
Width of cuff on under sleeve, 4 1/4"

The only measurement I can't get that I really want on this portrait is the length of the bodice! This is one of the important measurements, but I can eyeball that when we mock up a toile.

Continuing Analysis of RVIGoD (Red Velvet Italian Gown....of Doom)


***Photoshop to the rescue!!!***

Ok, so this is what I did

I took the original portrait and made it the background. I then found a picture of me in roughly the same position, wearing a corset and overlayed it. The overlay I brought the opacity down so I could see the portrait behind me. I moved around my pic to match up on the shoulders of the portrait. (The girl in the portrait has a much thinner, longer neck than I do!)

I then made a 'ruler' (the red dotted line) measuring off between my lips and chin.

And this is what I found out

The embroidered band on the camacia is around 2 1/2" wide
The front of the bodice is about 8" long
The sleeve of the gown is roughly 40" around
The hat is about 4 1/2" tall

From these few measurments, I am confident I can draft up patterns that will echo the fit of the portrait.


Back to the smock...So, I've determined the embroidery is around 2 1/2" wide. The part that is driving me crazy is that the left and right sides of camacia embroidery don't seem to be the same pattern! Her right side seems to to be based on diamonds, and the left side is based more on lines.

Some doodly sketches of possible embroidery designs...